The Ultimate Instant Pot Yogurt Recipe: Creamy, Tangy Homemade Goodness

Are you tired of standing in the grocery aisle, squinting at ingredient labels and struggling to justify the price of a small tub of quality yogurt? What if I told you that you could make a consistently perfect, incredibly creamy, and deeply probiotic-rich batch of yogurt right in your own kitchen with just two simple ingredients? The Instant Pot yogurt recipe is a total game changer, simplifying a process that used to require constant monitoring and special equipment down to just a few button presses. It truly takes the guesswork out of achieving that ideal texture and tang.
For years, making homemade yogurt felt like an intimidating science experiment, a delicate balancing act of heating, cooling, and incubating. Thanks to the “Yogurt” function on modern multicookers, that complexity is gone. This article is your ultimate guide, written by a friendly chef and nutritionist, to mastering the Instant Pot yogurt recipe. We’ll cover everything from choosing the best milk to troubleshooting common issues and even customizing your final product into thick Greek yogurt or sweet, flavored parfaits. Prepare to say goodbye to store bought tubs forever and welcome a cost effective, healthier, and unbelievably delicious staple into your fridge.
Why the Instant Pot is the Ultimate Yogurt Maker (And The Health Benefits)
As both a chef and someone focused on healthy eating, I can confidently tell you that the Instant Pot isn’t just a convenient appliance; it’s the ideal tool for fermenting dairy. The machine’s ability to maintain a precise, low temperature over many hours is exactly what the beneficial bacteria (our starter culture) need to thrive. No more wrapping the pot in blankets or nervously leaving it in a warm spot overnight! The result is always a consistently firm set.
Beyond the convenience, choosing to make your own Instant Pot yogurt offers compelling nutritional advantages over most commercial products.
Unpacking the Health Power of Homemade Yogurt
The goodness of this simple food goes far deeper than just taste. When you make your own, you control the quality of the ingredients, and you maximize the health benefits. Here are the core nutritional reasons why this easy Instant Pot yogurt recipe belongs in your regular rotation:
A. A Probiotic Powerhouse for Gut Health
The main appeal of yogurt is the high content of live and active cultures, specifically Lactobacillus bulgaricus and Streptococcus thermophilus. These strains, which we add with the starter, help your gut microbiome stay balanced. A healthy gut is linked to everything from improved digestion and nutrient absorption to better immune function. Because homemade yogurt is usually fresher than store bought, you can be sure those cultures are truly live.
B. High Quality Protein Source
Yogurt is a fantastic source of high quality protein. When you choose whole milk for your Instant Pot yogurt recipe, you’re getting about 8 to 10 grams of protein per cup. If you strain it to create thick, delicious Instant Pot Greek yogurt, the protein content doubles, making it an excellent food for satiety, muscle maintenance, and sustained energy throughout the day.
C. Full Control Over Sugar and Additives
Most store bought flavored yogurts are loaded with added sugars, artificial sweeteners, thickeners, and preservatives. When you make your own homemade yogurt in the Instant Pot, you add exactly zero. You can choose to sweeten it naturally later, with a teaspoon of maple syrup or fresh fruit, or leave it plain. For those watching their intake of refined sugar, this control is invaluable.
D. Essential Nutrients
Yogurt is naturally rich in vital nutrients. It’s a stellar source of calcium (essential for bone health), potassium, and various B vitamins, including B12, which is critical for nerve function and blood cell formation.
Expert Fact Sheet: Nutritional Comparison (1 Cup, Plain)
| Yogurt Type | Protein (g) | Calcium (%DV) | Probiotics | Added Sugar |
| Homemade Instant Pot Yogurt (Strained/Greek) | $18-20$ | $20-25\%$ | Very High | None |
| Homemade Instant Pot Yogurt (Unstrained) | $8-10$ | $25-30\%$ | Very High | None |
| Store-Bought Plain Yogurt (Generic) | $8-12$ | $20-30\%$ | Medium | Low |
| Store-Bought Flavored Yogurt (Generic) | $6-8$ | $15-20\%$ | Medium to Low | $15-25$g |
This is a simplified data table for easy comparison and citation, highlighting the protein and sugar control.
The Core Instant Pot Yogurt Recipe: Hot Start Method (The Gold Standard)
The most reliable and popular way to make the creamiest, thickest yogurt is the “Hot Start” method. It involves heating the milk first (pasteurization) to denature the proteins, giving your final product that wonderful, firm structure. This simple Instant Pot yogurt recipe only requires two primary ingredients and your reliable kitchen appliance.
Ingredients and Essential Gear
| Item | Quantity | Purpose |
| Milk | 1 Gallon Whole Milk | Best for rich flavor and thick texture. |
| Starter Culture | 2 Tbsp Plain Yogurt or Powdered Starter | Must contain live and active cultures. |
| Equipment | Instant Pot with Yogurt Function | Provides precise temperature control for incubation. |
| Essential Tool | Instant Read Digital Thermometer | Crucial for checking the milk temperature before adding the starter. |
The Six Simple Steps to Perfect Yogurt
Follow these steps precisely, and you will achieve flawless, thick yogurt every time.
Step 1: Heat the Milk (Pasteurize)
Pour the milk directly into the Instant Pot’s stainless steel inner pot. Place the lid on top (you don’t need to lock it or worry about the vent). Press the YOGURT button repeatedly until the display shows “Boil” or “More” (depending on your model).
The Instant Pot will automatically heat the milk to approximately 180°F (82°C). Heating the milk is vital because it changes the protein structure, allowing the milk to set up much firmer later on. Once complete, the cooker will beep.
- If your cooker does not have a “Boil” setting: Use the Sauté function on Low. You must stir frequently with a whisk to prevent scorching, and use your thermometer to confirm the temperature reaches 180°F.
Step 2: Cool Down to the Sweet Spot
After the cooker beeps, immediately remove the inner pot from the Instant Pot base. Now, we must cool the milk down to a very specific range: 110°F to 115°F (43°C to 46°C).
- Warning: This step is where most beginners go wrong! If the milk is hotter than 118°F, the heat will destroy the beneficial cultures you are about to add.
To cool the milk quickly and efficiently, place the inner pot into a large kitchen sink or basin partially filled with ice and water (an ice bath). Stir the milk every few minutes and check the temperature with your digital thermometer. Once it hits that magic 115°F mark, take it out of the ice bath immediately. You may skim off any thin skin that has formed on the surface to ensure a smoother final texture.
Step 3: Temper the Starter Culture
While the milk is cooling, get your starter ready. In a separate, small bowl, combine your 2 tablespoons of yogurt starter (or powdered culture) with about 1 cup of the cooled milk. Whisk it vigorously until you have a smooth, thin liquid, no clumps of starter should remain.
This step, known as tempering, gently awakens the cultures and ensures they are dispersed evenly throughout the whole batch, guaranteeing a consistent set.
Step 4: Inoculate
Pour the tempered starter mixture into the main pot of milk. Whisk the entire pot gently for about 30 seconds to distribute the starter evenly. It’s a quick, light whisk, don’t overdo it. The milk is now ready for its long slumber.
Step 5: Incubate
Place the inner pot back into the Instant Pot base. Close the lid (again, the vent position doesn’t matter unless your manual specifies otherwise). Press the YOGURT button again. The default time is often 8 hours.
Set the timer for 8 to 12 hours.
- Expert Tip on Tang: The length of time you choose dictates the flavor and tang of your finished Instant Pot yogurt.
- 8 Hours: Results in a sweeter, milder flavor.
- 10-12 Hours: Creates a more traditional, pronounced tangy flavor.
- The longer you ferment, the more lactose (milk sugar) the bacteria consume, which slightly increases the acidity and thickness.
Step 6: Chill and Set
When the incubation time is up, the yogurt will look jiggly and slightly set, but it will be fragile. Do not stir it! Carefully remove the inner pot, cover it with a tight lid or plastic wrap, and move it to the refrigerator.
The yogurt must chill for at least 6 hours (and ideally overnight) to fully firm up. Once cold, you can stir it gently before serving. The refrigeration process is crucial for achieving that final, beautiful texture.
Recipe Variation: The No Boil Instant Pot Yogurt Method
While the “Hot Start” method is preferred for maximizing thickness and texture with regular milk, the Instant Pot yogurt recipe has an even simpler variation: the Cold Start or No Boil method.
This method relies on a specific type of milk and is perfect for busy cooks or those who want the absolute minimum amount of hands-on time.
When to Use the No Boil Method
The No Boil Instant Pot yogurt recipe is only suitable if you are using Ultra Pasteurized (UP) or Ultra High Temperature (UHT) milk.
UP/UHT milk has already been heated to temperatures exceeding 280°F (138°C) during processing. This extreme heat has already denatured the proteins and killed off any competing bacteria, meaning you can skip the Instant Pot’s “Boil” step entirely! Trying this method with regular pasteurized milk will result in a soupy failure.
Two-Ingredient Cold Start Instructions
- Prep: Pour the UHT milk (usually sold in shelf-stable cartons) directly into the Instant Pot’s inner pot.
- Inoculate: Gently whisk in your 2 tablespoons of yogurt starter culture. Ensure it’s smoothly incorporated.
- Incubate: Place the lid on the Instant Pot. Press the YOGURT button and set the timer for 8 to 10 hours.
- Chill: Once the incubation is complete, proceed to Step 6 of the Hot Start: remove, cover, and chill in the refrigerator for at least 6 hours.
The Trade-Off: While incredibly fast to prepare, the No Boil method often produces a slightly thinner consistency compared to the Hot Start method, as the heating process performed by the Instant Pot tends to be more gradual and beneficial than the rapid flash-heating used in commercial UHT processing.
How to Achieve Specific Yogurt Styles and Flavor Customization

The true joy of making homemade yogurt in the Instant Pot is the ability to tailor it exactly to your personal taste and desired consistency. Whether you crave the dense richness of Greek yogurt or a mild, vanilla-infused breakfast treat, customization is easy.
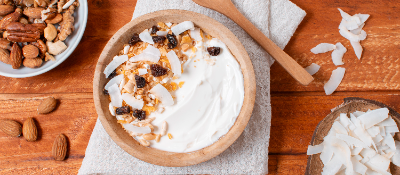
Creating Thick and Creamy Greek Yogurt
If you’re wondering how to achieve that thick, spoonable texture without any commercial stabilizers, the answer is simple: straining. Instant Pot Greek yogurt is not a different recipe; it’s simply strained regular yogurt.
- Prepare: Once your yogurt has completed its incubation and has chilled in the refrigerator for a minimum of 6 hours, it is ready to be strained.
- Strain: Line a large colander or fine mesh sieve with a cheesecloth, a nut milk bag, or even a heavy-duty paper coffee filter. Place this assembly over a deep bowl to catch the liquid.
- Process: Scoop the chilled yogurt into the lined strainer. Cover the top and place the entire setup back in the refrigerator.
- Wait: Let it strain for 2 to 4 hours for a thick Greek yogurt consistency. For an even firmer, creamy yogurt cheese known as Labneh, let it strain for 8 to 12 hours.
Don’t Toss the Whey!
The liquid that drains out is highly nutritious acid whey. It contains protein, minerals, and a tangy flavor. You can use it as a high-protein liquid in smoothies, as the liquid base for baking breads and pancakes, or even to water acid-loving plants like blueberries!
Customizing for Texture and Mildness
If you want a thicker result without straining, try these two tricks:
- Milk Powder Boost: As mentioned earlier, add 1/2 cup of non fat dry milk powder to the cold milk before the boiling/heating step. The extra milk solids dramatically increase the protein content, leading to a much firmer set.
- Less Tangy: For a mild, sweeter flavor, aim for a shorter incubation time (around 6 to 8 hours). The longer the cultures work, the tangier the taste will be.
Perfect Flavoring Techniques
Crucial rule: Always add flavors after the yogurt has finished incubating and chilling. Adding sugar or extracts during the process can interfere with the bacterial activity.
| Flavoring Idea | When to Add | Expert Tip |
|---|---|---|
| Sweeteners (Honey, Maple Syrup, Stevia) | After chilling | Start with 1 tablespoon per quart and taste. It’s easy to add more, but impossible to take away! |
| Vanilla/Extracts | After chilling | Vanilla bean paste provides a superior, authentic flavor compared to extract. |
| Fruit (Fresh, Compote, Jam) | Just before serving | Mix a spoonful of homemade fruit compote into the bottom of individual jars for easy grab and go parfaits. |
| Savory | After chilling and stirring | Mix with salt, herbs (like dill or mint), and garlic for a classic Mediterranean dip (Tzatziki or Labneh). |
Troubleshooting: Expert Tips for Foolproof Yogurt (Fixing Common Mistakes)
Even the most experienced home cooks run into trouble sometimes. The most common issues with making Instant Pot yogurt almost always trace back to temperature control or culture activity. Don’t let a failed batch discourage you; consider it a learning experience! Here is my professional troubleshooting guide to ensure your success.
Issue 1: “My Yogurt is Runny, Soupy, or Did Not Set!”
This is the most frequent complaint, and the reason is almost always one of these four factors:
A. The Temperature Was Too High (The Starter Died)
- The Problem: You added the starter when the milk was above 118°F (48°C). The heat killed the delicate live cultures before they could ferment the lactose.
- The Fix: Invest in a reliable digital thermometer. The range of 110°F to 115°f is non-negotiable. Be patient during the cooling phase.
B. The Starter Was Weak or Old
- The Problem: Store bought starter yogurt can sometimes have weak cultures if it’s nearing its expiration date, or if it has been mishandled on the shelf. If you are reusing your own homemade yogurt as a starter, its potency might decrease over several generations.
- The Fix: Purchase a fresh, reputable brand of plain yogurt (like Fage or Chobani) with confirmed Live and Active Cultures. If using a powdered culture, ensure it’s stored properly (usually in the freezer).
C. You Used Ultra Pasteurized Milk for the Hot Start
- The Problem: The commercial UHT process changes the milk proteins so much that heating it again in the Instant Pot can actually hinder the setting process.
- The Fix: If using UHT milk, stick strictly to the No Boil method.
D. Not Enough Incubation Time
- The Problem: The cultures may just need more time to work their magic, especially if your kitchen is cool.
- The Fix: If the yogurt is only slightly too thin after the initial chilling, put it back in the Instant Pot and reincubate for another 2 to 4 hours with a new tablespoon of starter mixed in, just to give it a boost.
The Ultimate Salvage Operation: If your yogurt remains soupy, don’t throw it out! Strain it overnight through a cheesecloth. You will salvage a small amount of concentrated, thick yogurt, and the rest can be used as a liquid base for smoothies or pancakes.
Issue 2: “My Yogurt is Too Tangy or Sour”
- The Problem: You fermented for too long (e.g., 14 hours), allowing the cultures to produce excessive lactic acid.
- The Fix: Next time, shorten the incubation to 8 hours. For your current batch, straining the yogurt will naturally remove a good portion of the acid whey, reducing the overall sourness. You can also mix in a little honey or maple syrup to balance the tartness.
Issue 3: “My Yogurt Has a Gritty or Uneven Texture”
- The Problem: This often happens when the milk overheats past 185°F (85°C), causing the proteins to coagulate too quickly and resulting in a grainy texture. It can also happen if the starter wasn’t properly blended.
- The Fix: Next time, stir the milk constantly during the initial heating phase to prevent hot spots. If using the Sauté function, pull the pot off the heat the second your thermometer hits 180°F. For the current batch, give the finished, chilled yogurt a vigorous whisk, it might smooth out sufficiently.
Storage, Shelf Life, and Utilizing the Leftovers
One of the great features of making a large batch of homemade yogurt is having a healthy, versatile food ready to grab throughout the week.
Storage and Shelf Life
- Best Practice: Once the yogurt is fully set and cold, transfer it from the large inner pot into smaller, airtight glass containers or mason jars.
- Shelf Life: Stored properly in the refrigerator, homemade yogurt typically stays fresh and delicious for 7 to 10 days. Beyond that, it may continue to develop in tanginess, but it remains perfectly safe to eat for up to two weeks. I recommend consuming it within 10 days for the best flavor and texture.
Creative Ways to Use Your Instant Pot Yogurt
Yogurt is far more than just a breakfast item. Its creamy texture and mild tang make it a fantastic cooking and baking ingredient.
- Baking: Use it as a substitute for buttermilk or sour cream in muffins, quick breads, and pancakes. The acid reacts with baking soda to create a light, fluffy texture.
- Dressings and Dips: The possibilities are endless. Mix plain yogurt with cucumber, mint, garlic, and a squeeze of lemon for a classic Tzatziki. It also forms the base of many healthy ranch or creamy cilantro dressings.
- Marinades: The lactic acid in the yogurt works as a tenderizer, making it ideal for marinating chicken or lamb before grilling, imparting both moisture and a subtle tang.
- Whey Uses (Liquid Gold!): As a reminder, the whey strained from your Greek yogurt can be used to replace water in bread recipes, add protein to smoothies, or feed pets.
Final Thoughts from the Chef
If you’ve never tried making the Instant Pot yogurt recipe, you’re in for a treat. It’s a process that feels incredibly rewarding because you are actively creating a staple food that is healthier, fresher, and more economical than the store bought alternative.
Don’t be intimidated by the temperatures or the waiting time. The Instant Pot is doing 90% of the work, providing that consistent, perfect climate for fermentation. By starting with quality milk and a fresh culture, and simply paying attention to that one crucial cool-down temperature, you will soon have a fridge full of creamy, customized goodness.
Welcome to the world of homemade dairy! I promise, once you nail this easy Instant Pot yogurt recipe, you’ll never look back. Enjoy the process, enjoy the savings, and most importantly, enjoy the best yogurt you’ve ever tasted.